

Well it has begun – Gail, Debbie and I have once again invaded some poor soul’s kitchen and baked the first part of our Christmas
 cookie collection. We started at about 11 am and ended about 7 pm - leaving our host’s house in somewhat good order, with only a couple boxes of cookies left in our wake to indicate we had even been there.
 Well, I should say that Debbie and I started baking at about 11am - Gail was miserably late. Naughty, naughty Gail! But Gail also learned a very important lesson - bringing 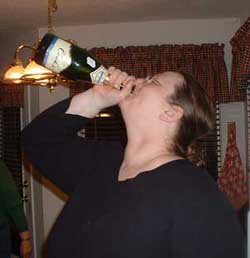
First round of cookies, we made batches of refrigerator cookies - the “one dough will rule them all” cookies to be precise. I tackled the chocolate mocha stripes and the molasses spice rounds. Gail tackled the checkerboard cookies. Debbie stayed away from the whole fiasco and brought her favorite roll-out cookie dough.
I just want to clarify: I am not a real fan of any recipe that asks me to “knead in” flavoring ingredients after the dough has been put together. For the chocolate mocha stripes, the original recipe called for me to take one plain recipe of dough and break it into thirds, flavoring each third with the various components. Instead, I made the base recipe three times, adding in the flavorings as I added the other ingredients. I know, I know – that defeats the whole purpose of a “mother” dough – but guess what? I don’t care. I will post the recipe below and show you what modifications I made so you can cheat too.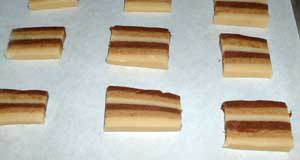
I liked the recipe actually. The stripes were pretty if somewhat brown and the flavor was pleasant. The texture was crisp. I whipped up a batch of just the chocolate dough and made cut outs of piggies and bears; their heads tasted really good when I bit them off.
The Molasses Spice rounds on the other hand? Nope! Why make something that is mediocre when you have much better options? The spice f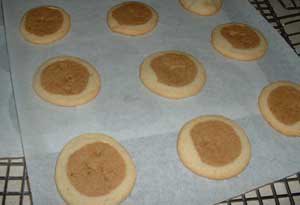 lavor was very mild - and the molasses non-existent. Oh- and the texture was just like the other cookies. And my rounds look more like eggs, but that was a production error. I never could figure out how they get those beautiful round shapes shown in the pictures.
Gail was supposed to make these tropical checker board squares, but since she didn’t have the macadamia nuts or the rum flavoring, she reinvented them as raspberry stripe cookies. Personally, I think that with a hat shaped cookie cutter, you could use the dough for Cat-in-the-Hat cookies. Texture? You guessed it! Gail also brought some gingerbread men which we decorated as well.
 Debbie’s cutout cookies were tasty. However, Deb and I both hate icing on cookies and decided colored sugar was the way to go! See the pretty colors? See the unhappy bears with their red eye and frownie mouths? Tiny candies are a bitch to work with, by the way. I just wanted you to know that.
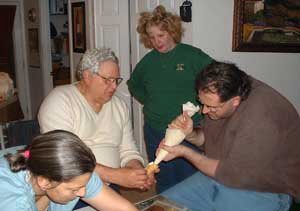
 The stars of the show, though, were Barb and Nick. Gail, Debbie and I all work with their son Frank. They were kind enough to let us come into their home and trash the joint. And as our reward, they made pizzelles and cannolis. Well, kinda cannolis. Cannolis are supposed to have deep fried shells. Since we were not deep frying a damn thing – Nick rolled the pizzelles into tubes and filled them with a fantastic ricotta cream. True, the cookies got soft fast - but that was not an issue as we ate those bad boys as fast as possible.
 Here is a picture of the entire family working on making us some damn tasty treats. Thank you guys for taking such good care of us and letting us use your home as HQ for this week’s cookie bake-fest! (That is Gail's head in the lower left corner. She is kinda camera shy.)
Here is the recipe I promised you - more to come!
BASIC PATTERN DOUGH
This dough will be your starting point for all of the pattern cookies.
Prep: 15 min.
3/4 cup butter, softened
1 cup sugar
1/2 teaspoon baking powder
1 egg
1 teaspoon vanilla
¼ teaspoon salt
2 cups all-purpose flour
Beat butter 30 seconds. Beat in sugar, baking powder, and 1/4 teaspoon salt. Beat in egg and vanilla. Beat in as much of the flour as you can with mixer. Stir in any remaining flour. Makes about 2 1/2 cups dough.
(My changes – I used the traditional creaming method. All dry ingredients shifted together. Butter whipped with sugar until combined - add egg and vanilla. Add dry ingredients.)
CHOCOLATE-COFFEE RIBBONS
Prep: 50 min. Chill: 1+1 hr.
Bake: 8 min. per batch
1 recipe Basic Pattern Dough
2 tablespoons instant Swiss-style coffee powder
1 ounce unsweetened chocolate, melted and cooled
1. Divide Basic Pattern Dough into thirds. Knead coffee powder into one
portion of dough. Stir chocolate into another portion of dough (knead if necessary). Divide each dough portion in half. Cover and chill at least 1 hour or until easy to handle.
2. On waxed paper, roll a portion of chocolate dough into an 8x6-inch rectangle (keep remaining dough chilled); place waxed paper with dough rectangle on a cookie sheet, dough side up. On another sheet of waxed paper, roll a portion of plain dough into an 8x6 inch rectangle. Invert plain dough onto chocolate dough; peel off waxed paper. On same piece of waxed paper, roll a portion, of coffee dough into an 8x6-inch rectangle. Invert coffee dough onto plain dough; peel off waxed paper. Repeat with remaining doughs to form a six-layer stack. Press together lightly. Wrap and chill for 1 hour.
3. Preheat oven to 375°F. Trim edges of dough stack. Cut stack in half lengthwise, forming two rectangles. Cut each rectangle crosswise into 1/4 inch-thick slices. Arrange slices, cut sides down, 2 inches apart on ungreased cookie sheet. Bake in preheated oven about 8 minutes or until edges are lightly browned. Transfer to wire rack; cool. Makes 4 dozen.
(My changes – I made three batches of the "Mother" dough and added these ingredients to one of each of the batches. No kneading - no tough cookies.
For the Chocolate dough – I pulled out ¼ cup of flour and substituted ¼ cup of cocoa powder instead. Less mess-less fuss.
For the Coffee dough - I added regular old freeze-dried coffee because that is what I had in the cupboard.)
TO STORE: Layer between waxed paper in an airtight container; cover. Store at room temperature for up to 3 days or freeze for up to 3 months.
No comments:
Post a Comment